こんにちは!エンジニアの柳村です。
Twitterなどの3rd partyのログイン機能を提供しているアプリは6/30までに対応が必要です。(2ヶ月延期されましたね!)
アプリ単体でSign in with Appleをできるようにするのはとても簡単です。しかし大抵のアプリの場合はそれだけでは完結せず、サーバー側でSign in したユーザーと紐付ける必要があります。
サーバー側はFirebase AuthenticationやAuth0といったIDaaSにまかせるという手もありますが、今回は自前で実装することを前提にその実現方法を見ていきたいと思います。
全体の流れ
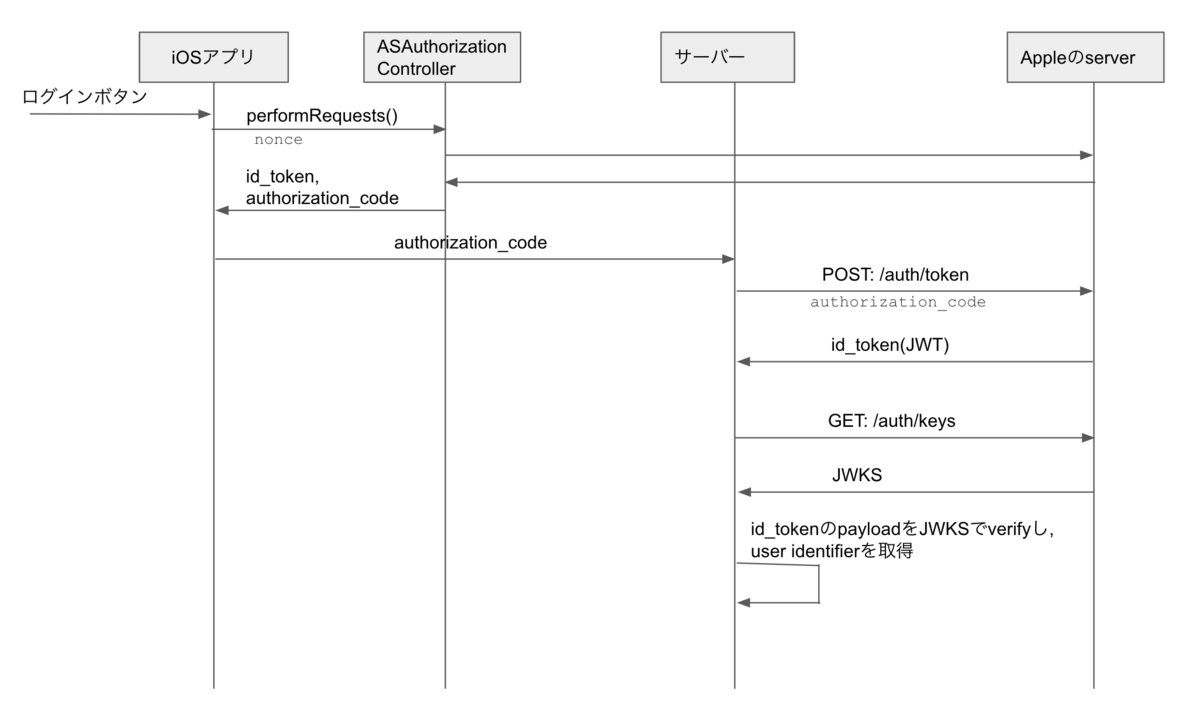
クライアント側とサーバー側のざっとした流れはこのようになります。

クライアントからサーバー側にid_tokenを渡すやり方とauthorization_codeを渡すやり方の2つの方法がありますが、ここではauthorization_codeを使ったやり方のみ紹介します。また、nonceの生成やクライアントサーバ間の受け渡し方法についても割愛します。
iOSアプリ側
Apple Developer Programでやること
アプリのIdentifierのCapabilitiesにSign in with Appleを設定します。
その際に、configureボタンを押してPrimary App IDを設定します。
また、Identifierを更新するとProvisioning ProfileがInvalidになってしまうので更新する必要があります。
XcodeのProject設定でやること
TARGETSのSigning&Capabilitiesで+Capabilityを押してSign in with Appleを追加します。
実装
iOSアプリ側でやることは、Sign in with Appleをするボタンを用意し、ボタンが押されたらASAuthorizationAppleIDProviderを生成し、performRequest()を呼ぶとログインに成功するとcallbackが呼ばれ、authorization_codeが取得できるので、これをサーバーに渡すだけです。(ドキュメント: Implementing User Authentication with Sign in with Apple)
ボタンの用意
import AuthenticationServices
...

let appleButton = ASAuthorizationAppleIDButton() // デザインを変えたい場合はUIButtonなどに変えれば良い
appleButton.rx.controlEvent(.touchUpInside)
    .subscribe(onNext: { [unowned self] in
        let appleIDProvider = ASAuthorizationAppleIDProvider()
        let request = appleIDProvider.createRequest()
        request.requestedScopes = [.email]
        request.nonce = `something` // nonceについては割愛します

        let authorizationController = ASAuthorizationController(authorizationRequests: [request])
        authorizationController.delegate = self
        authorizationController.presentationContextProvider = self
        authorizationController.performRequests()
    })
    .disposed(by: disposeBag)
delegateの実装
extension XXViewController: ASAuthorizationControllerDelegate {
    @available(iOS 13.0, *)
    func authorizationController(controller: ASAuthorizationController, didCompleteWithAuthorization authorization: ASAuthorization) {
        switch authorization.credential {
        case let appleIDCredential as ASAuthorizationAppleIDCredential:
            // ここでauthorizationCodeやidTokenが取得できる。
            print("#apple \(String(data: appleIDCredential.identityToken!, encoding: .utf8))")
            print("#apple \(String(data: appleIDCredential.authorizationCode!, encoding: .utf8))")

            // サーバーにauthorizationCode送る処理
        default:
            break
        }
    }
}

extension XXViewController: ASAuthorizationControllerPresentationContextProviding {
    @available(iOS 13.0, *)
    func presentationAnchor(for controller: ASAuthorizationController) -> ASPresentationAnchor {
        return view.window!
    }
}
サーバー側
Apple Developer Programでやること
Keysでkeyを追加します。
Sign in with AppleをENABLEにし、configureボタンを押してPrimary App IDを設定します。
作成が完了すると秘密鍵(.p8)をダウンロードします。この秘密鍵と作成したKeyのKey IDは、次でclient secretを作成するのに使います。
サーバー側の実装概要
サーバー側でやることは大きく2ステップで、まずAppleの/auth/token APIを叩いてid token(JWT)を取得します。
次にid tokenをAppleの/auth/keys APIを叩いて取得した公開鍵でverifyしてuser identifierを取得します。
id tokenの取得
1. client secret(JWT)の作成
以下のheaderとpayloadを使ってJWTを生成します。
header
{
  alg: ES256,
  kid: // Apple Developer ProgramのKeysで作成したKeyのKeyID
}
payload
{
  iss: // TEAM ID,
  iat: 今の時間,
  exp: 今の時間+適当な値(max 15777000),
  aud: https://appleid.apple.com,
  sub: // Bundle ID
}
署名はApple Developer ProgramのKeysで作成したときにダウンロードした秘密鍵を使います。
2. /auth/tokenにPOSTする
以下のデータをhttps://appleid.apple.com/auth/tokenにPOSTします。API仕様
{
    client_id: // Bundle ID
    client_secret: // 1. でつくったclient secretをいれる,
    code: , // iOSアプリから受け取ったauthorization_codeをセットする
    grant_type: 'authorization_code',
    redirect_uri: ""// 空文字
}
成功するとid_tokenが含まれたJSONが取得できます。
id tokenのverify
上で取得したid token(JWT)をverifyする必要があります。
1. 公開鍵の取得
https://appleid.apple.com/auth/keysをGETするとJWKSが取得できます。(API仕様
これには複数のJWKが含まれています。この中から、JWKのkidとid tokenのheaderのkidと一致するものを使って公開鍵を生成します。
2. id tokenのverify
ドキュメントのVerify the Identity Token に以下のように記載があります。
- Verify the JWS E256 signature using the server’s public key

- Verify the nonce for the authentication

- Verify that the iss field contains https://appleid.apple.com

- Verify that the aud field is the developer’s client_id

- Verify that the time is earlier than the exp value of the token
これに従って、1. で取得した公開鍵を使ってid tokenをverifyし、id tokenのpayloadのnonce, iss, aud, timeを検証します。
id tokenのpayloadに含まれる内容は以下になります。(ドキュメント)
{
  iss: 'https://appleid.apple.com'
  sub: // The unique identifier for the user.
  aud: // Bundle ID
  exp: // expire time
  iat: // The time the token was issued.
  nonce: // nonce
  nonce_supported: true or false,
  email: // The user's email address.
  email_verified: true or false,
}
subがuser identifierになるので、これを使ってユーザーを識別します。
まとめ
このように、iOSアプリ側は割と簡単に実装できますが、サーバー側は結構やることがあります。Googleみたいにサーバ側用のライブラリが用意されていればよいのですが、残念ながらAppleは用意してくれていません。。Githubにいくつかライブラリがありましたが、実装が間違っている(特にid tokenのverify周り)ものがときどき見受けられたので選定には注意が必要かなと思いました。Sign in with Appleを導入し、かつ自前でサーバー側も実装する場合は余裕を持って取り組んだほうがよさそうかなと思いましたので、まだ3ヶ月くらいありますが早めに対応したほうがよさそうでした。
最後に宣伝です!
コネヒトではエンジニアを募集しておりますので少しでも興味のある人はお話だけでも聞きにきてください! www.wantedly.com