
みなさんこんにちは。今期からPdMも兼務しております、たかぱい(@takapy0210)です。
先日、横浜マラソンのペアリレー(ハーフマラソン)に参加しました。
20km以上の距離を走るのは人生で初めてだったこともあり、3〜4ヶ月前くらいから練習をし本番に臨みました。
結果として完走はできたのですが、目標としていた2時間というタイムは達成できなかったので、2025年3月リベンジマラソンをする予定です。(ちなみにこのマラソンで右膝に爆弾を抱えたので、まずはこの爆弾を除去するところからのスタートです)
さて本日は、データカタログを自動生成する機構を作ってみたので、そのお話をしようと思います。
この記事はコネヒト Advent Calendar 2024 6日目の記事です。
目次
どんなものが自動生成されるのか
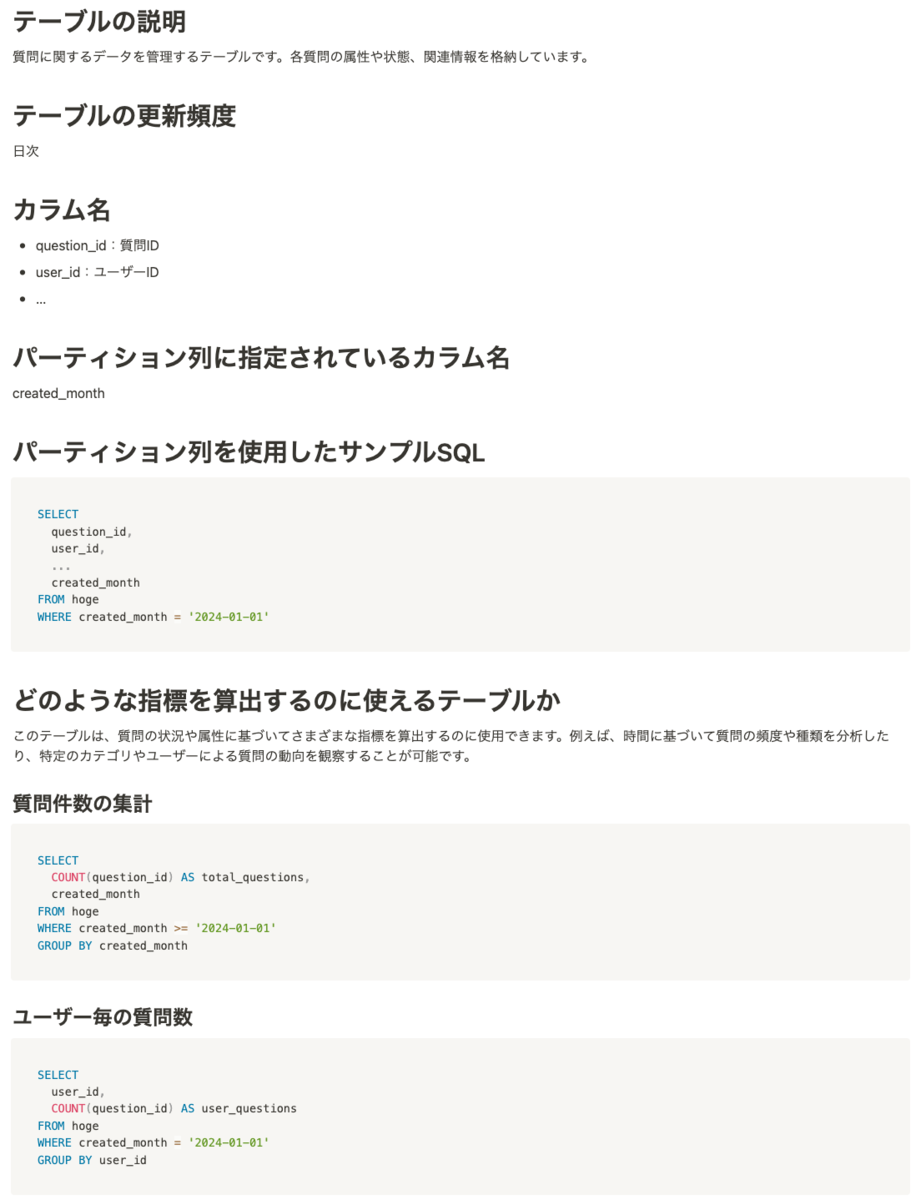
先に結論からということで、実際に自動生成されるものをお見せします。
以下は実際に弊社が運営する「ママリ」の質問情報が格納されているテーブルのデータカタログ例です。
メタ情報だけでなく、サンプルSQLなども合わせて生成することで、どのようなクエリを書けば良いかがパッと見で分かるような工夫をしています。
このサンプルSQLはLLMを用いて生成しており、この辺がLLMを使っている理由の1つとなります。
以降で、導入背景や実装の工夫についてお話ししていきます。
背景
2024/12現在、弊社ではデータETLツールとしてDataformを採用しています。
よくdbtと比較検討されるツールですが、学習コストや運用コストが低く導入ハードルが低い点において、専属のデータエンジニアがいない現在の組織状況とフィットしていることもあり採用に至りました。
このDataformですが、SQLファイルを拡張したSQLXと呼ばれるファイルを用いて、ETLワークフローを定義していきます。
SQLXファイルは以下のように記述でき、これらのファイルをGithubで管理しています。
config {
    type: "incremental",
    database: "dwh",
    schema: "warehouse",
    name: "users",
    columns: {
        user_id: "ユーザーID",
        user_name: "ユーザー名",
        ...
    },
    bigquery: {
        partitionBy: "meta_exec_date",
        partitionExpirationDays: 4000,
        requirePartitionFilter: true,
    },
    ...
}

SELECT
    user_id,
    user_name,
    ...
FROM ...
このDataform自体にはデータカタログの生成機能は備わっていないため、データカタログを作成・運用したい場合は、Google Cloudの他サービス(例:Data Catalog など)を用いて作成するか、自前でデータカタログを作成・運用していく必要があります。
今回はNotion上に自前でデータカタログを作成する運用にしました。
なぜNotionを使うことにしたのか
弊社では、ドキュメンテーションツールとして既にNotionを導入しており、全社員が日常的に利用しています。
このため、Notionの使い方に慣れており、他のツールやサービスを新たに導入する場合に比べて学習コストがかかりません。
日々利用しているツール上にデータカタログがあることで、誰でも簡単にアクセスできるという利点があります。
また、データカタログが見づらかったり操作が煩雑だったりすれば、せっかく整備したとしても使われないものになってしまう可能性があります。
データ分析を社内文化として定着させるためには、誰でも簡単に情報にアクセスでき、活用しやすい環境を整えることが不可欠だと思っています。
これらの点を考慮して今回はNotion上に作成することにしました。
全体像
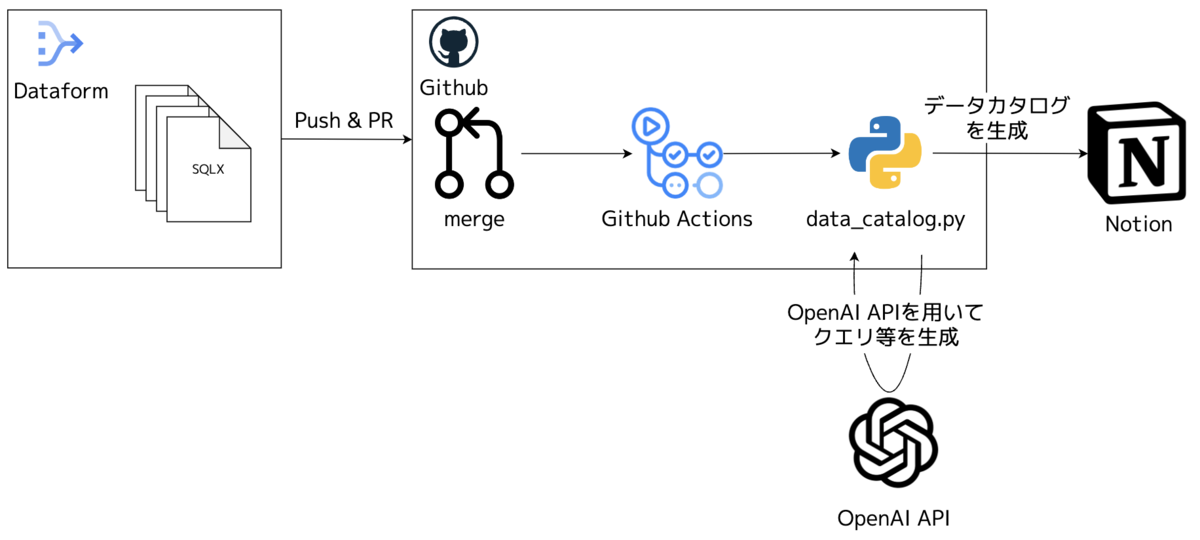
主な使用技術と全体のアーキテクチャは以下の通りです。
- OpenAI API: データカタログのサンプルSQLの自動生成などに利用
- Notion API: Notionにデータカタログを作成・更新するために利用
- GitHub Actions: データカタログ生成ワークフローの構築に利用
- Python: OpenAI APIとNotion APIを用いてNotionのページを作成する処理に利用
全体の処理の流れとしては以下のようになっており、Dataformで開発を行っているだけで、意識せずにデータカタログが作成・更新されるようになっています。
以降では、Github Actionsとそこから呼ばれるPythonの実装について詳しく紹介します。
データカタログ自動生成処理について
処理の流れはシンプルで、Github Actions上で以下2つの条件いずれかをトリガーとし、Notion上のデータカタログDBに新規追加 or 更新を行うPythonスクリプトを動かす、というものです。
- Githubのmainブランチにマージしたタイミングで変更のあったSQLXファイルを対象に自動実行
- 特定のディレクトリを指定して、そのディレクトリ配下のSQLXファイル全てを対象に手動実行
Github Actions
Actionsの処理としては、データカタログの生成対象となるSQLXファイルのリストを取得し、そのリストを CHANGED_FILES という環境変数に設定した状態で、指定したPythonスクリプトを実行する、というシンプルなワークフローとなっています。(コードは一部省略)
name: Update data catalog

on:
  push:
    branches:
      - main
    paths:
      - 'definitions/dwh/**/*.sqlx'
  workflow_dispatch:
    inputs:
      directory:
        description: 'Please enter the path of the directory you want to process'
        required: true
        default: 'definitions/dwh'

jobs:
  update-notion:
    runs-on: ubuntu-latest

    steps:
      - name: Checking out a repository
        uses: actions/checkout@v3

      - name: Python setup
        uses: actions/setup-python@v4
        with:
          python-version: '3.12'

      - name: Installing dependencies
        run: |
          python3 -m pip install -r workflow_scripts/requirements.txt

      # 自動実行:変更のあったSQLXファイル一覧を取得
      - name: Execute the process using the modified file (main push)
        id: get-changed-files
        if: github.event_name == 'push'
        uses: tj-actions/changed-files@v45
        with:
          files: |
            definitions/dwh/**/*.sqlx
          files_ignore: |
            definitions/dwh/sources/**/*.sqlx

      # 手動実行:inputsとして入力されたディレクトリ配下のSQLXファイル一覧を取得
      - name: Processes all files in the specified directory and sub-directories (workflow_dispatch)
        id: get-all-files
        if: github.event_name == 'workflow_dispatch'
        run: |
          DIRECTORY="${{ github.event.inputs.directory }}"
          if [ -d "$DIRECTORY" ]; then
            FILES=$(find "$DIRECTORY" -type f -name '*.sqlx' ! -path "$DIRECTORY/sources/*")
            FILES="${FILES//$'\n'/' '}"
            echo "all_files=$FILES" >> $GITHUB_OUTPUT
          else
            echo "The specified directory cannot be found: $DIRECTORY"
            exit 1
          fi

      # Pythonスクリプトを実行
      - name: Executing Python scripts
        env:
          OPENAI_API_KEY: ${{ secrets.OPENAI_API_KEY }}
          NOTION_API_KEY: ${{ secrets.NOTION_API_KEY }}
          NOTION_DB_ID: ${{ secrets.NOTION_DB_ID }}
          CHANGED_FILES: ${{ steps.get-changed-files.outputs.all_modified_files || steps.get-all-files.outputs.all_files }}
        run: |
          echo "Processing files: $CHANGED_FILES"
          python3 create_data_catalog.py
実際に動くPythonの処理について事項で紹介します。
実際に動いているPythonの処理
以下がOpenAI APIとNotion APIを用いてデータカタログを自動生成するPythonスクリプトのサンプルです(コードは一部省略)
この処理でのポイントは以下の2点です。
import os
import re

from openai import OpenAI
from notion_client import Client
from dotenv import load_dotenv

from logger import get_logger

LOGGER = get_logger(name=__name__)

load_dotenv()
openai = OpenAI(api_key=os.getenv("OPENAI_API_KEY"),)
notion = Client(auth=os.getenv("NOTION_API_KEY"))
database_id = os.getenv("NOTION_DB_ID")

# 環境変数から変更されたファイルのリストを取得
changed_files_env = os.getenv("CHANGED_FILES")
changed_files = changed_files_env.strip().split()


def read_sqlx_file(file_path: str) -> str:
    """sqlxファイルを読み込み、その内容を返す
    """
    with open(file_path, 'r') as file:
        return file.read()


def get_table_name(file_content: str) -> str:
    """sqlxファイルの内容からFROM句のテーブル名を取得する
    """
    # configブロックを抽出
    config_match = re.search(r'config\s*\{([^}]*)\}', file_content, re.DOTALL)
    table_name = ""

    if config_match:
        config_content = config_match.group(1)
        # database、schema、nameを抽出
        database_match = re.search(r'database\s*:\s*"([^"]+)"', config_content)
        schema_match = re.search(r'schema\s*:\s*"([^"]+)"', config_content)
        name_match = re.search(r'name\s*:\s*"([^"]+)"', config_content)

        if database_match and schema_match and name_match:
            database = database_match.group(1)
            schema = schema_match.group(1)
            name = name_match.group(1)
            table_name = f'{database}.{schema}.{name}'
            LOGGER.info(f"Table name is {table_name}")
        else:
            LOGGER.info("The database, schema, or name was not found")
            return ""
    else:
        LOGGER.info("The config block was not found")
        return ""

    return table_name

def generate_data_catalog(table_name:str, file_content: str) -> str:
    """LLMを用いてsqlxファイルからデータカタログを生成する
    """
    # プロンプト(一部省略)
    prompt = f"""
    弊社はDataformを用いて、BigQueryのデータ基盤を構築しています。
    そこで、添付のsqlxファイルからデータカタログを作りたいです。以下の注意事項を守りつつ、「出力したい項目」を抽出し、Markdown形式で出力してください。

    ...

    ### 出力したい項目
    以下の項目をH1「#」で出力し、その中身をsqlxファイルから抽出して記述してください。
    - ...
    - どのような指標を算出するのに使えるテーブルか
        - テーブルの説明やカラム名から推測して記述してください
        - 指標算出に使えるサンプルSQLの出力が可能であれば、それもセットで出力してください。自信がなければ出力しなくてOKです。
            - こちらのサンプルSQLもパーティション列を使用して出力してください。可能であれば1つだけでなく複数のサンプルがあると嬉しいです。
    - ...

    ### 実際のsqlxファイル
    """

    # LLMによるカタログの生成
    chat_completion = openai.chat.completions.create(
        messages=[
            {
                "role": "user",
                "content": prompt + "\n\n" + file_content,
            }
        ],
        model="gpt-4o-mini",
    )

    return chat_completion.choices[0].message.content


def markdown_to_notion_blocks(markdown_text: str) -> list[str]:
    """Markdown形式のテキストをNotionのBlockに変換する
    """

    blocks = []
    lines = markdown_text.split('\n')
    for line in lines:
        # ヘッディングの解析
        if re.match(r'^# ', line):
            blocks.append({
                "type": "heading_1",
                "heading_1": {
                    "rich_text": [{"type": "text", "text": {"content": line[2:]}}],
                }
            })
        elif re.match(r'^## ', line):
            blocks.append({
                "type": "heading_2",
                "heading_2": {
                    "rich_text": [{"type": "text", "text": {"content": line[3:]}}],
                }
            })
        elif re.match(r'^### ', line):
            blocks.append({
                "type": "heading_3",
                "heading_3": {
                    "rich_text": [{"type": "text", "text": {"content": line[4:]}}],
                }
            })

        # コードブロックの解析
        elif re.match(r'^```', line):
            # コードブロックの開始または終了
            if 'in_code_block' in locals() and in_code_block:
                in_code_block = False
            else:
                in_code_block = True
                code_lines = []
        elif 'in_code_block' in locals() and in_code_block:
            code_lines.append(line)
            # コードブロック内では何もしない

        # 箇条書きの解析
        elif re.match(r'^- ', line):
            blocks.append({
                "type": "bulleted_list_item",
                "bulleted_list_item": {
                    "rich_text": [{"type": "text", "text": {"content": line[2:]}}],
                }
            })

        # 空行の処理
        elif line.strip() == '':
            pass  # 空行は無視
        else:
            # 通常のパラグラフ
            blocks.append({
                "type": "paragraph",
                "paragraph": {
                    "rich_text": [{"type": "text", "text": {"content": line}}],
                }
            })

        # コードブロックの終了時にブロックを追加
        if 'in_code_block' in locals() and not in_code_block and 'code_lines' in locals():
            blocks.append({
                "type": "code",
                "code": {
                    "rich_text": [{"type": "text", "text": {"content": '\n'.join(code_lines)}}],
                    "language": "sql",  # 必要に応じて言語を設定
                }
            })
            del code_lines  # コードラインをリセット

    return blocks


def update_notion_page(table_name: str, catalog_content: str) -> dict:
    """Notionのデータベースにデータカタログを作成or更新する
    """

    search_response = notion.databases.query(database_id=database_id, filter={"property": "Name", "title": {"equals": table_name}})
    results = search_response.get("results")

    # markdown形式でページを作成するため、NotionのBlockに適応した形のdictに変換する
    markdown_blocks = markdown_to_notion_blocks(catalog_content)

    # rich_textプロパティに設定できる文字列の長さは2000文字以下なので、それを超える場合は文字列をカットする
    if len(catalog_content) > 2000:
        catalog_content = catalog_content[:2000]

    if results:
        page_id = results[0]["id"]

        # 「Description」プロパティを更新
        notion.pages.update(
            page_id=page_id,
            properties={
                "Description": {
                    "rich_text": [{"type": "text", "text": {"content": catalog_content}}]
                }
            }
        )

        # Notion APIではページの更新ができないため、一度ページ内全ての子ブロックを取得し削除する
        existing_children = notion.blocks.children.list(page_id)
        for child in existing_children['results']:
            block_id = child['id']
            notion.blocks.delete(block_id)

    else:
        # ページが存在しない場合は新しく作成する
        new_page = {
            "parent": {"database_id": database_id},
            "properties": {
                "Name": {
                    "title": [{"type": "text", "text": {"content": table_name}}]
                },
                "Description": {
                    "rich_text": [{"type": "text", "text": {"content": catalog_content}}]
                },
            },
        }
        page = notion.pages.create(**new_page)
        page_id = page["id"]

    res = notion.blocks.children.append(page_id, children=markdown_blocks)

    return res


if __name__ == "__main__":

    # actions/checkoutで取得したファイルのリストを処理
    for file_path in changed_files:
        if not file_path.endswith('.sqlx'):
            continue

        # ファイルの内容を取得
        file_content = read_sqlx_file(file_path)
        # sqlxの内容から、FROM句のテーブル名を取得
        table_name = get_table_name(file_content)
        # LLMを用いてデータカタログを生成
        catalog_content = generate_data_catalog(table_name, file_content)
        # Notionのデータベースにデータカタログを作成or更新
        res = update_notion_page(table_name, catalog_content)
        LOGGER.info(f"{file_path} has been processed")
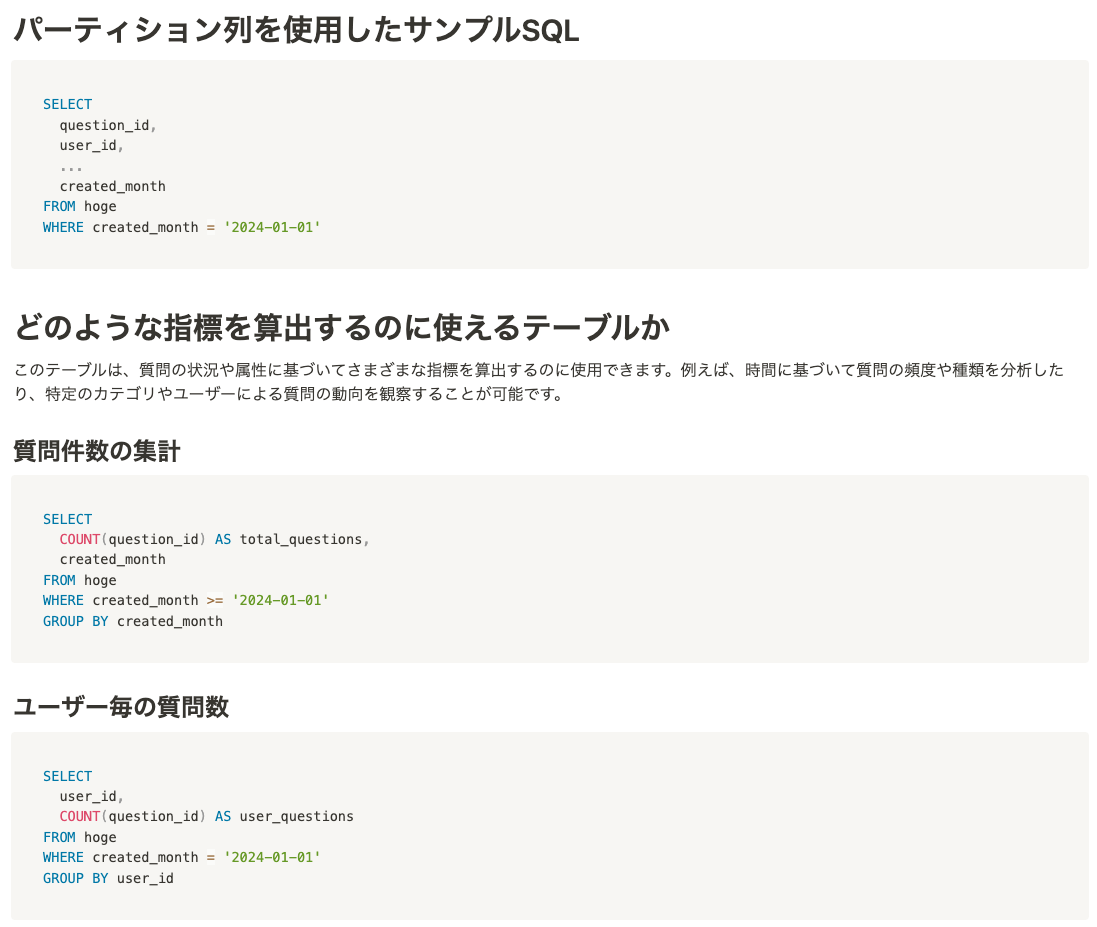
サンプルSQLも自動生成している点
冒頭で紹介した通り、テーブルのメタ情報だけではなく、どのような指標を計算するのに使えるテーブルなのか、また、その指標はどのようなSQLで記述できるのか?という情報も合わせてカタログに出力しています。
このSQLの生成は、LLMを用いることで実現しています。
NotionのURLが変更されないようにしている点
2024/12現在、Notion APIにUpdateのメソッドは無く、Delete or Createのみが行えます。
Notion上に既に存在するデータカタログをアップデートする場合、そのページ自体を削除し新規ページを作成してしまうと、新規ページのURLが元のページと異なってしまうため、例えばURLでブックマークなどをしているユーザーからしてみると、ページにアクセスできなくなってしまい不便です。
そこで、Notionのページとしては残しつつ、中身(Notion用語では子ブロック)だけを全部削除し、まっさらな状態にしたのち、更新されたSQLXの内容を用いてページに書き込む、といった処理を行なっています。
こうすることで、URLは変わらずにページの中身のみが更新されます。
実際の処理としては以下の部分です。
子ブロックを全て取得し、その要素を1つずつループしながらDelete APIを呼ぶ、というかなり泥臭いことをやっています。 (親ページのIDだけ指定したら中身を全部DeleteするAPIが欲しい・・・)
# Notion APIではページの更新ができないため、一度ページ内全ての子ブロックを取得し削除する
existing_children = notion.blocks.children.list(page_id)
for child in existing_children['results']:
    block_id = child['id']
    notion.blocks.delete(block_id)
蛇足ですが、Markdowm形式の文字列をそのままNotionのページに書き込むとUIが崩れるので、以下のようにブロック要素に適宜書き換えてあげる必要があります。
この辺はNotion APIを使う辛みだなと思いながら手を動かしていました。
def markdown_to_notion_blocks(markdown_text: str) -> list[str]:
    """Markdown形式のテキストをNotionのBlockに変換する
    """

    blocks = []
    lines = markdown_text.split('\n')
    for line in lines:
        # ヘッディングの解析
        if re.match(r'^# ', line):
            blocks.append({
                "type": "heading_1",
                "heading_1": {
                    "rich_text": [{"type": "text", "text": {"content": line[2:]}}],
                }
            })
        elif re.match(r'^## ', line):
            blocks.append({
                "type": "heading_2",
                "heading_2": {
                    "rich_text": [{"type": "text", "text": {"content": line[3:]}}],
                }
            })
        elif re.match(r'^### ', line):
            blocks.append({
                "type": "heading_3",
                "heading_3": {
                    "rich_text": [{"type": "text", "text": {"content": line[4:]}}],
                }
            })

        # コードブロックの解析
        elif re.match(r'^```', line):
            # コードブロックの開始または終了
            if 'in_code_block' in locals() and in_code_block:
                in_code_block = False
            else:
                in_code_block = True
                code_lines = []
        elif 'in_code_block' in locals() and in_code_block:
            code_lines.append(line)
            # コードブロック内では何もしない

        # 箇条書きの解析
        elif re.match(r'^- ', line):
            blocks.append({
                "type": "bulleted_list_item",
                "bulleted_list_item": {
                    "rich_text": [{"type": "text", "text": {"content": line[2:]}}],
                }
            })

        # 空行の処理
        elif line.strip() == '':
            pass  # 空行は無視
        else:
            # 通常のパラグラフ
            blocks.append({
                "type": "paragraph",
                "paragraph": {
                    "rich_text": [{"type": "text", "text": {"content": line}}],
                }
            })

        # コードブロックの終了時にブロックを追加
        if 'in_code_block' in locals() and not in_code_block and 'code_lines' in locals():
            blocks.append({
                "type": "code",
                "code": {
                    "rich_text": [{"type": "text", "text": {"content": '\n'.join(code_lines)}}],
                    "language": "sql",  # 必要に応じて言語を設定
                }
            })
            del code_lines  # コードラインをリセット

    return blocks
まとめ
本日はLLMを用いてNotion上にデータカタログを自動生成する方法について紹介しました。
Notionはブロックという概念で構成されていることもあり、APIの使い方は少々クセがあるので、その辺も踏まえてサンプルコードがみなさんの一助になればと思っています。
データカタログに関しては運用を始めて間もないこともあり、データ基盤の整備とセットで、今後使ってくれる人を増やす動きをしていきたいと考えています。